1. 环境准备
- 由于 Apache Hive 是一款基于 Hadoop 的数据仓库软件,通常部署运行在 Linux 系统之上。因此不管使用何种方式配置 Hive Metastore,必须要先保证服务器的基础环境正常,Hadoop 集群健康可用。
- 服务器基础环境
- 集群时间同步、防火墙关闭、主机Host映射、免密登录、JDK安装
- Hadoop 集群健康可用
- 启动 Hive 之前必须先启动 Hadoop 集群。
- 特别要注意,需等待 HDFS 安全模式关闭之后再启动运行 Hive。
- Hive 不是分布式安装运行的软件,其分布式的特性主要借由 Hadoop 完成,包括分布式存储、分布式计算。
2. 安装 MySQL
2.1. 删除 自带mariadb
[root@hadoop102 ~]# rpm -qa|grep mariadb
mariadb-libs-5.5.60-1.el7_5.x86_64
[root@hadoop102 ~]# rpm -e mariadb-libs-5.5.60-1.el7_5.x86_64 --nodeps
[root@hadoop102 ~]# rpm -qa|grep mariadb
[root@hadoop102 ~]#
2.2. 安装软件
-
上传文件安装包
- 解压缩
tar xvf mysql-5.7.29-1.el7.x86_64.rpm-bundle.tar[root@hadoop102 mysql]# tar xvf mysql-5.7.29-1.el7.x86_64.rpm-bundle.tar mysql-community-embedded-devel-5.7.29-1.el7.x86_64.rpm mysql-community-test-5.7.29-1.el7.x86_64.rpm mysql-community-embedded-5.7.29-1.el7.x86_64.rpm mysql-community-embedded-compat-5.7.29-1.el7.x86_64.rpm mysql-community-libs-5.7.29-1.el7.x86_64.rpm mysql-community-client-5.7.29-1.el7.x86_64.rpm mysql-community-server-5.7.29-1.el7.x86_64.rpm mysql-community-devel-5.7.29-1.el7.x86_64.rpm mysql-community-libs-compat-5.7.29-1.el7.x86_64.rpm mysql-community-common-5.7.29-1.el7.x86_64.rpm [root@hadoop102 mysql]# ls mysql-5.7.29-1.el7.x86_64.rpm-bundle.tar mysql-community-embedded-devel-5.7.29-1.el7.x86_64.rpm mysql-community-client-5.7.29-1.el7.x86_64.rpm mysql-community-libs-5.7.29-1.el7.x86_64.rpm mysql-community-common-5.7.29-1.el7.x86_64.rpm mysql-community-libs-compat-5.7.29-1.el7.x86_64.rpm mysql-community-devel-5.7.29-1.el7.x86_64.rpm mysql-community-server-5.7.29-1.el7.x86_64.rpm mysql-community-embedded-5.7.29-1.el7.x86_64.rpm mysql-community-test-5.7.29-1.el7.x86_64.rpm mysql-community-embedded-compat-5.7.29-1.el7.x86_64.rpm -
安装依赖
yum -y install libaio[root@hadoop102 mysql]# yum -y install libaio Loaded plugins: fastestmirror Determining fastest mirrors base | 3.6 kB 00:00:00 epel | 4.7 kB 00:00:00 extras | 2.9 kB 00:00:00 updates | 2.9 kB 00:00:00 (1/7): base/7/x86_64/group_gz | 153 kB 00:00:00 (2/7): epel/x86_64/group_gz | 96 kB 00:00:00 (3/7): base/7/x86_64/primary_db | 6.1 MB 00:00:00 (4/7): epel/x86_64/updateinfo | 1.1 MB 00:00:00 (5/7): epel/x86_64/primary_db | 7.0 MB 00:00:00 (6/7): extras/7/x86_64/primary_db | 247 kB 00:00:00 (7/7): updates/7/x86_64/primary_db | 16 MB 00:00:00 Resolving Dependencies --> Running transaction check ---> Package libaio.x86_64 0:0.3.109-13.el7 will be installed --> Finished Dependency Resolution Dependencies Resolved =================================================================================================================================================== Package Arch Version Repository Size =================================================================================================================================================== Installing: libaio x86_64 0.3.109-13.el7 base 24 k Transaction Summary =================================================================================================================================================== Install 1 Package Total download size: 24 k Installed size: 38 k Downloading packages: libaio-0.3.109-13.el7.x86_64.rpm | 24 kB 00:00:00 Running transaction check Running transaction test Transaction test succeeded Running transaction ** Found 2 pre-existing rpmdb problem(s), 'yum check' output follows: 2:postfix-2.10.1-6.el7.x86_64 has missing requires of libmysqlclient.so.18()(64bit) 2:postfix-2.10.1-6.el7.x86_64 has missing requires of libmysqlclient.so.18(libmysqlclient_18)(64bit) Installing : libaio-0.3.109-13.el7.x86_64 1/1 Verifying : libaio-0.3.109-13.el7.x86_64 1/1 Installed: libaio.x86_64 0:0.3.109-13.el7 Complete! -
安装 mysql
rpm -ivh mysql-community-common-5.7.29-1.el7.x86_64.rpm mysql-community-libs-5.7.29-1.el7.x86_64.rpm mysql-community-client-5.7.29-1.el7.x86_64.rpm mysql-community-server-5.7.29-1.el7.x86_64.rpm[root@hadoop102 mysql]# rpm -ivh mysql-community-common-5.7.29-1.el7.x86_64.rpm mysql-community-libs-5.7.29-1.el7.x86_64.rpm mysql-community-client-5.7.29-1.el7.x86_64.rpm mysql-community-server-5.7.29-1.el7.x86_64.rpm warning: mysql-community-common-5.7.29-1.el7.x86_64.rpm: Header V3 DSA/SHA1 Signature, key ID 5072e1f5: NOKEY Preparing... ################################# [100%] Updating / installing... 1:mysql-community-common-5.7.29-1.e################################# [ 25%] 2:mysql-community-libs-5.7.29-1.el7################################# [ 50%] 3:mysql-community-client-5.7.29-1.e################################# [ 75%] 4:mysql-community-server-5.7.29-1.e################################# [100%]
初始化配置 MySQL
- 初始化启动
mysqld --initialize - 更改所属组
chown mysql:mysql /var/lib/mysql -R - 启动 mysql
systemctl start mysqld.service -
查看生成的临时 root 密码
cat /var/log/mysqld.log ... [Note] A temporary password is generated for root@localhost: o+TU+KDOm004 -
修改root密码 授权远程访问 设置开机自启动
[root@node2 ~]# mysql -u root -p
Enter password:     #这里输入在日志中生成的临时密码
Welcome to the MySQL monitor.  Commands end with ; or \g.
Your MySQL connection id is 3
Server version: 5.7.29

Copyright (c) 2000, 2020, Oracle and/or its affiliates. All rights reserved.

Oracle is a registered trademark of Oracle Corporation and/or its
affiliates. Other names may be trademarks of their respective
owners.

Type 'help;' or '\h' for help. Type '\c' to clear the current input statement.

mysql>


#更新root密码  设置为hadoop
mysql> alter user user() identified by "hadoop";
Query OK, 0 rows affected (0.00 sec)


#授权
mysql> use mysql;

mysql> GRANT ALL PRIVILEGES ON *.* TO 'root'@'%' IDENTIFIED BY 'hadoop' WITH GRANT OPTION;

mysql> FLUSH PRIVILEGES;

#mysql的启动和关闭 状态查看 (这几个命令必须记住)
systemctl stop mysqld
systemctl status mysqld
systemctl start mysqld

#建议设置为开机自启动服务
[root@node2 ~]# systemctl enable  mysqld
Created symlink from /etc/systemd/system/multi-user.target.wants/mysqld.service to /usr/lib/systemd/system/mysqld.service.

#查看是否已经设置自启动成功
[root@node2 ~]# systemctl list-unit-files | grep mysqld
mysqld.service                                enabled
3. Hive 安装部署
3.1. 部署方式
- 单机部署
- Hive 不是分布式软件,但是却又分布式的能力;
- Hive 使用 HDFS 存储数据,而 HDFS 是分布式的;
- Hive 计算数据使用 MR、Spark、Tez,而这些计算引擎是分布式的。
3.2. 上传解压
- 上传文件 apache-hive-3.1.2-bin.tar.gz 到服务器。
3.3. 修改 guava 包
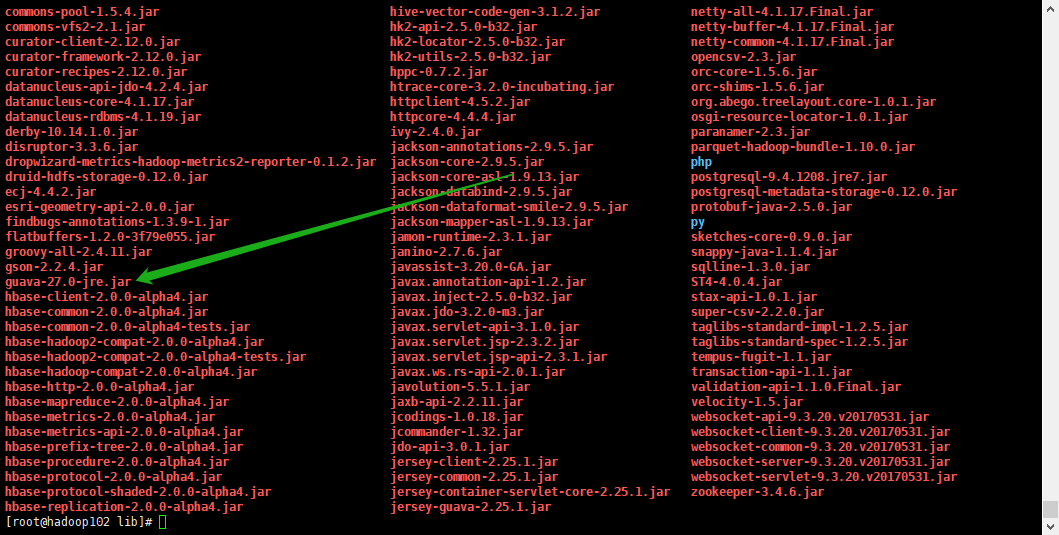
- hive 自带的 guava 包版本太低,需要替换成 hadoop 中的 guava 包;
cd hive/ rm -rf lib/guava-19.0.jar cp /usr/local/hadoop-3.1.3/share/hadoop/common/lib/guava-27.0-jre.jar ./lib/ cd lib/ & ls -
查看 guava 包已被更新至 hadoop 使用的更高版本 guava-27.0

3.4. 修改 hive 配置文件
-
编辑 hive-env.sh
vim hive-env.shexport HADOOP_HOME=/usr/local/hadoop-3.1.3 export HIVE_CONF_DIR=/usr/local/hive/conf export HIVE_AUX_JARS_PATH=/usr/local/hive/lib -
编辑 hive-site.xml
vim hive-site.xml<configuration> <!-- 存储元数据mysql相关配置 --> <property> <name>javax.jdo.option.ConnectionURL</name> <value>jdbc:mysql://hadoop102:3306/hive3?createDatabaseIfNotExist=true&useSSL=false&useUnicode=true&characterEncoding=UTF-8</value> </property> <property> <name>javax.jdo.option.ConnectionDriverName</name> <value>com.mysql.jdbc.Driver</value> </property> <!-- 密码账号 --> <property> <name>javax.jdo.option.ConnectionUserName</name> <value>root</value> </property> <!-- mysql 密码 --> <property> <name>javax.jdo.option.ConnectionPassword</name> <value>hadoop</value> </property> <!-- H2S运行绑定host --> <property> <name>hive.server2.thrift.bind.host</name> <value>hadoop102</value> </property> <!-- 远程模式部署metastore metastore地址 --> <property> <name>hive.metastore.uris</name> <value>thrift://hadoop102:9083</value> </property> <!-- 关闭元数据存储授权 --> <property> <name>hive.metastore.event.db.notification.api.auth</name> <value>false</value> </property> </configuration>
3.5. 修改 Hadoop 中 core-site.xml
- 因为Hive需要把数据存储在HDFS上,并且通过MapReduce作为执行引擎处理数据;
-
因此需要在Hadoop中添加相关配置属性,以满足Hive在Hadoop上运行。
-
core-site.xml
vim core-site.xml<!--该参数表示可以通过httpfs接口hdfs的ip地址限制--> <property> <name>hadoop.proxyuser.root.hosts</name> <value>*</value> </property> <!--通过httpfs接口访问的用户获得的群组身份--> <property> <name>hadoop.proxyuser.root.groups</name> <value>*</value> </property> - 修改文件后,需要在 Hadoop 集群同步配置文件,重启 hadoop 生效。
3.6。 重启 hadoop 集群
- 略。
3.5. 上传 mysql jar 包
- 上传 jar 文件
mysql-connector-java-5.1.32.jar;
4. 启动 Hive
4.1. 初始化 hive 元数据
-
schema 初始化命令
cd /hive/bin ./schematool -initSchema -dbType mysql -verbos -
下面提示标识初始化成功
  ...
  Initialization script completed
  schemaTool completed
4.2. 启动 metastore 服务
- 前台启动
- 可以根据需求添加参数开启 debug 日志,获取详细日志信息,便于排错。
- 进程会一直占据终端,
ctrl + c结束进程,服务关闭。 ``` /hive/bin/hive –service metastore
/hive/bin/hive –service metastore –hiveconf hive.root.logger=DEBUG,console
``` - 后台启动
nohup ./hive/bin/hive --service metastore &
5. Hive 客户端使用
5.1. Hive自带客户端
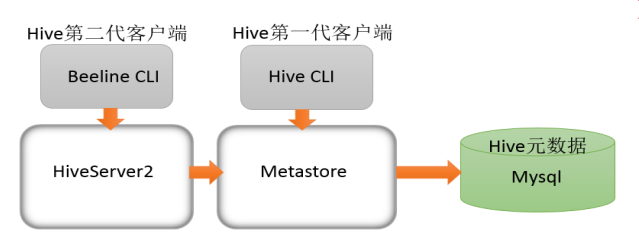
- Hive 发展至今,总共历经了两代客户端工具。
- 第一代客户端 bin/hive(deprecated不推荐使用):
- $HIVE_HOME/bin/hive, 是一个 shellUtil。
- 主要功能:
- 一是可用于以交互或批处理模式运行Hive查询;
- 二是用于Hive相关服务的启动,比如metastore服务。
- 第二代客户端 bin/beeline(recommended 推荐使用):
- $HIVE_HOME/bin/beeline,是一个JDBC客户端,是官方强烈推荐使用的Hive命令行工具,和第一代客户端相比,性能加强安全性提高。
5.2. HiveServer2 服务
- 远程模式下 beeline 通过 Thrift 连接到单独的 HiveServer2 服务上,这也是官方推荐在生产环境中使用的模式。
- HiveServer2 支持多客户端的并发和身份认证,旨在为开放 API 客户端如 JDBC、ODBC 提供更好的支持。
HiveServer2 通过 Metastore 服务读写元数据,在远程模式下,启动 HiveServer2 之前必须先首先启动 metastore服务。
- 特别注意:
- 远程模式下,Beeline 客户端只能通过 HiveServer2 服务访问 Hive,而 bin/hive 是通过Metastore服务访问的。
-
hive 客户端和服务的具体关系,如下图:

5.3. 在 hadoop103 使用 beeline 客户端 远程访问 HiveServer2
-
scp hive 到 hadoop103
scp -r hive hadoop103:/usr/local -
启动 hiveserver2
nohup /hive/bin/hive --service metastore & nohup /hive/bin/hive --service hiveserver2 & -
启动 beeline
cd /hive ./beeline -
处理报错:Cannot find hadoop installation
- 报错内容:
Cannot find hadoop installation: $HADOOP_HOME or $HADOOP_PREFIX must be set or hadoop must be in the path
- 报错内容:
-
解决办法:执行
source hive-env.shcd /hive/conf source hive-env.sh -
再次启动 beeline
cd /hive ./beeline -
得到如下提示
[root@hadoop103 bin]# ./beeline SLF4J: Class path contains multiple SLF4J bindings. SLF4J: Found binding in [jar:file:/usr/local/hive/lib/log4j-slf4j-impl-2.10.0.jar!/org/slf4j/impl/StaticLoggerBinder.class] SLF4J: Found binding in [jar:file:/usr/local/hadoop-3.1.3/share/hadoop/common/lib/slf4j-log4j12-1.7.25.jar!/org/slf4j/impl/StaticLoggerBinder.class] SLF4J: See http://www.slf4j.org/codes.html#multiple_bindings for an explanation. SLF4J: Actual binding is of type [org.apache.logging.slf4j.Log4jLoggerFactory] SLF4J: Class path contains multiple SLF4J bindings. SLF4J: Found binding in [jar:file:/usr/local/hive/lib/log4j-slf4j-impl-2.10.0.jar!/org/slf4j/impl/StaticLoggerBinder.class] SLF4J: Found binding in [jar:file:/usr/local/apache-hive-3.1.2-bin/lib/log4j-slf4j-impl-2.10.0.jar!/org/slf4j/impl/StaticLoggerBinder.class] SLF4J: Found binding in [jar:file:/usr/local/hadoop-3.1.3/share/hadoop/common/lib/slf4j-log4j12-1.7.25.jar!/org/slf4j/impl/StaticLoggerBinder.class] SLF4J: See http://www.slf4j.org/codes.html#multiple_bindings for an explanation. SLF4J: Actual binding is of type [org.apache.logging.slf4j.Log4jLoggerFactory] Beeline version 3.1.2 by Apache Hive beeline> -
连接 HS2
beeline> ! connect jdbc:hive2://hadoop102:10000 Connecting to jdbc:hive2://hadoop102:10000 Enter username for jdbc:hive2://hadoop102:10000: root Enter password for jdbc:hive2://hadoop102:10000: Connected to: Apache Hive (version 3.1.2) Driver: Hive JDBC (version 3.1.2) Transaction isolation: TRANSACTION_REPEATABLE_READ 0: jdbc:hive2://hadoop102:10000> -
执行 show tables;
  0: jdbc:hive2://hadoop102:10000> show tables;
  INFO  : Compiling command(queryId=root_20220630230711_bbf7a441-313a-4a33-b3dc-b4192c9b4fc1): show tables
  INFO  : Concurrency mode is disabled, not creating a lock manager
  INFO  : Semantic Analysis Completed (retrial = false)
  INFO  : Returning Hive schema: Schema(fieldSchemas:[FieldSchema(name:tab_name, type:string, comment:from deserializer)], properties:null)
  INFO  : Completed compiling command(queryId=root_20220630230711_bbf7a441-313a-4a33-b3dc-b4192c9b4fc1); Time taken: 1.139 seconds
  INFO  : Concurrency mode is disabled, not creating a lock manager
  INFO  : Executing command(queryId=root_20220630230711_bbf7a441-313a-4a33-b3dc-b4192c9b4fc1): show tables
  INFO  : Starting task [Stage-0:DDL] in serial mode
  INFO  : Completed executing command(queryId=root_20220630230711_bbf7a441-313a-4a33-b3dc-b4192c9b4fc1); Time taken: 0.09 seconds
  INFO  : OK
  INFO  : Concurrency mode is disabled, not creating a lock manager
  +-----------+
  | tab_name  |
  +-----------+
  +-----------+
  No rows selected (1.576 seconds)
  0: jdbc:hive2://hadoop102:10000>
6. DataGrip 连接 Hive
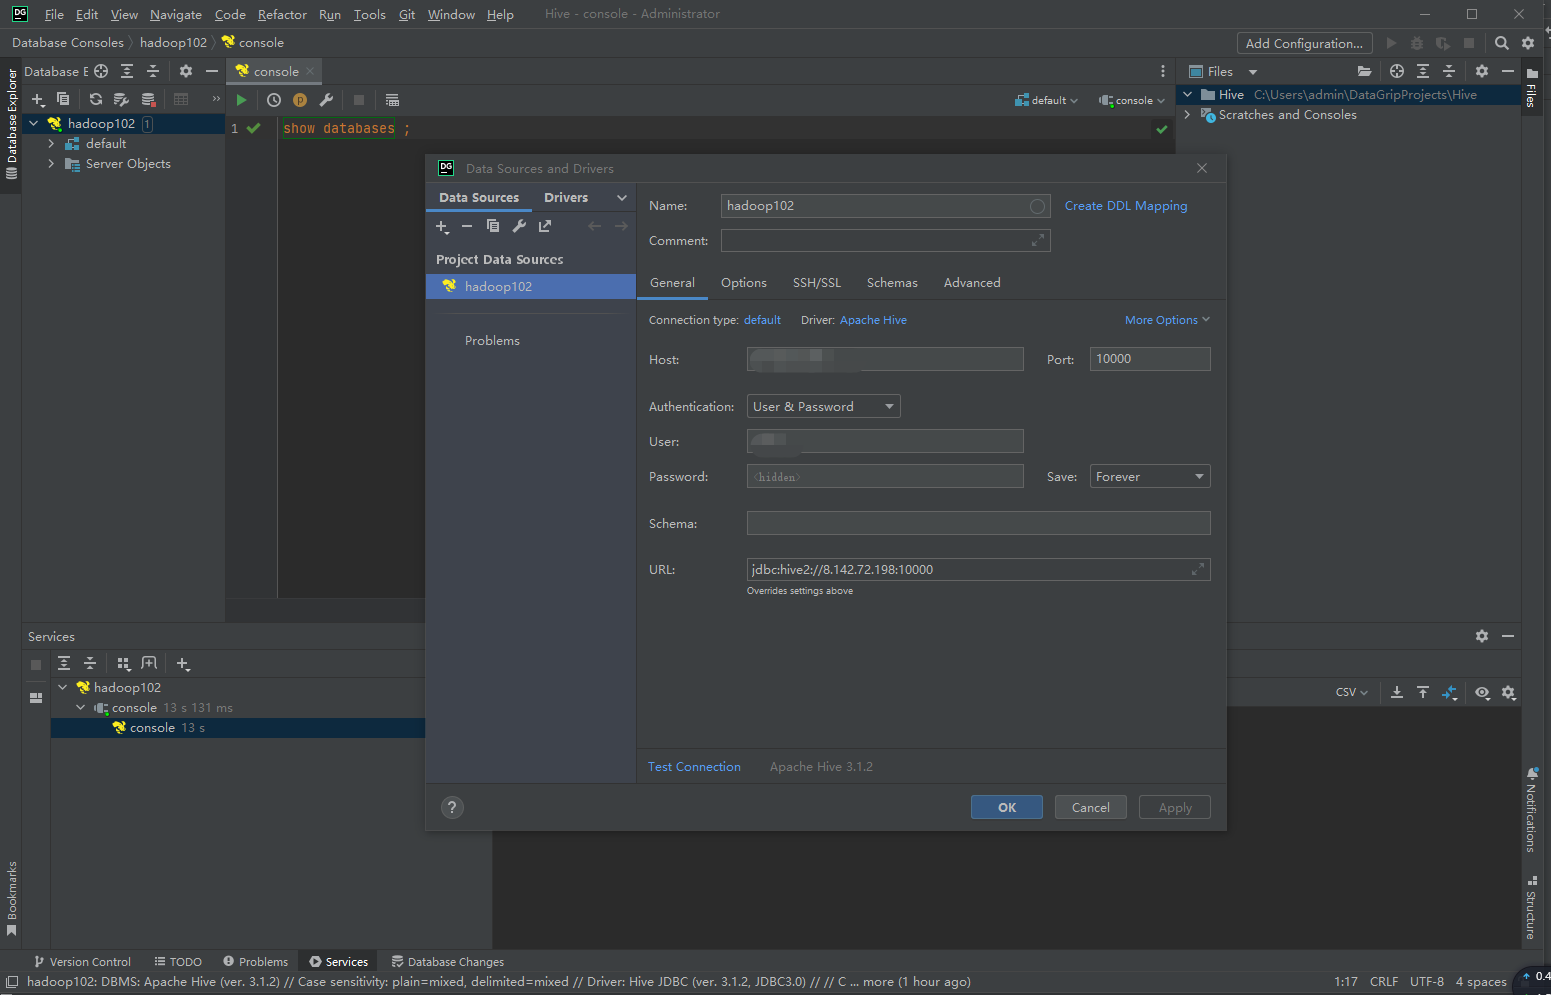
-
建立连接

-
创建 database
create database test; -
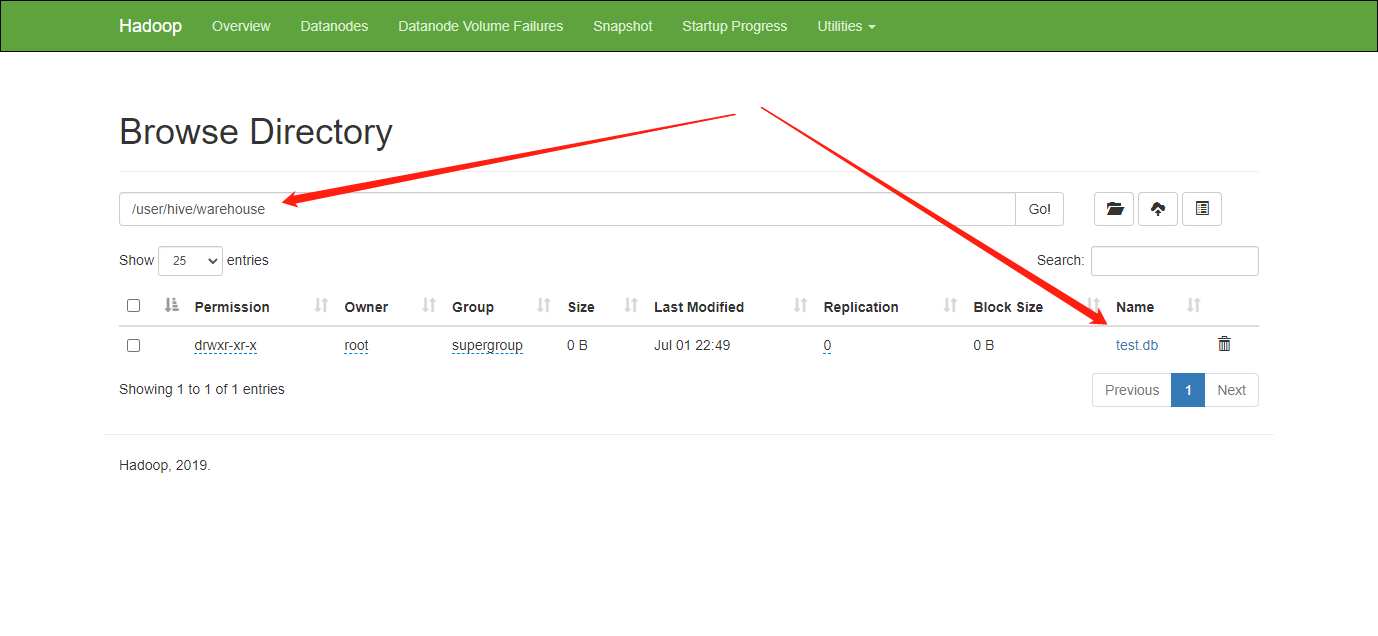
查看库
- 文件位置:
/user/hive/warehouse - 看到 test.db;

- 文件位置: