1.前言
- 本文介绍的方法,是使用 Grafana 和 InfluxDB 对爬虫进行可视化监控。
- Grafana 是一个开源的分析和监控系统,拥有精美的web UI,支持多种图表,可以展示influxdb中存储的数据,并且有报警的功能。
- Influxdb 是一款开源的时间序列数据库,专门用来存储和时间相关的数据(比如我用它存储某个时间点爬虫抓取信息的数量)。
设计原理:爬虫将抓取的数据写入MongoDB,InfluxDB从MongoDB获取数据抓取情况,Grafana 从 InfluxDB 中获取爬虫抓取数据情况并做图形化展示。 系统环境:MacOS High Sierra 10.12.6
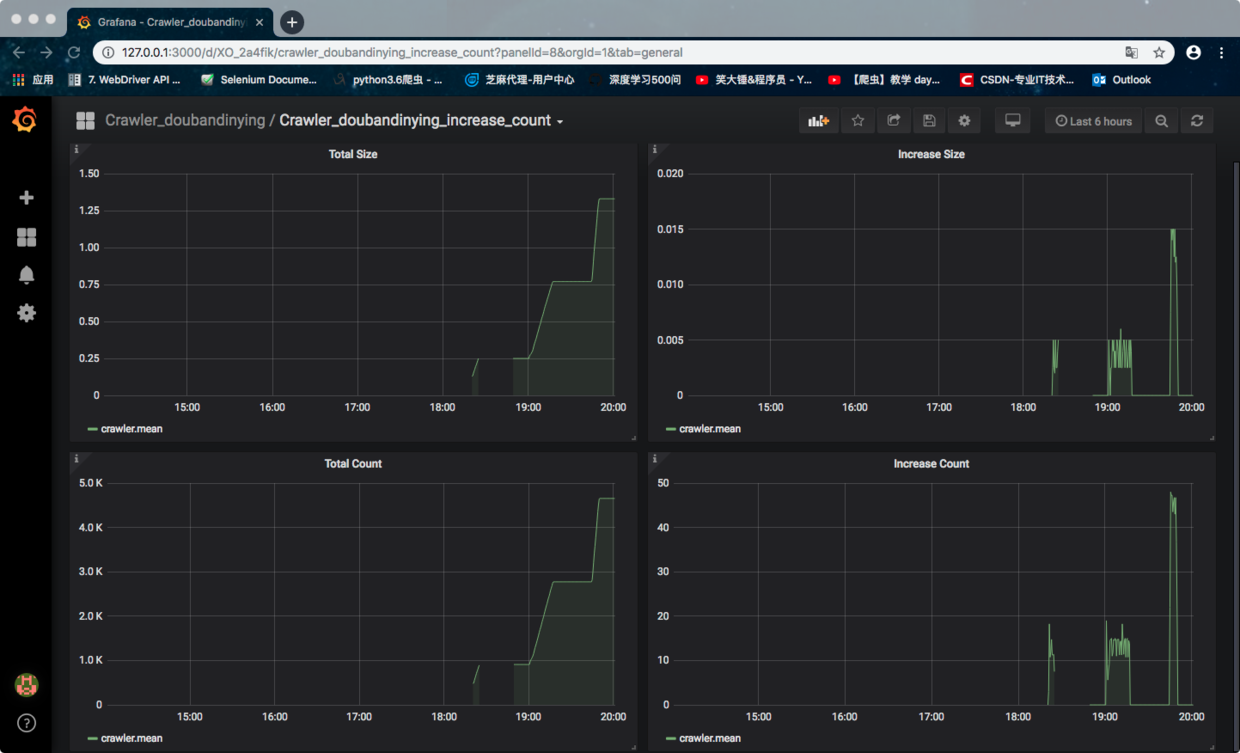
- 效果展示:
如下图:
2.Grafana介绍
- Grafana简介:
- Grafana 是一款采用 go 语言编写的开源应用;
- Grafana 主要用于大规模指标数据的可视化展现;
- Grafana有着非常漂亮的图表和布局展示,功能齐全的度量仪表盘和图形编辑器。
- Grafana支持数据源:
- Graphite;
- Zabbix;
- InfluxDB;
- Prometheus;
- OpenTSDB;
- 最新版本4.3.1已经支持 MySQL 数据源。
- Grafana 主要特性:
- 灵活丰富的图形化选项;
- 可以混合多种风格;
- 支持多个数据源;
- 拥有丰富的插件扩展;
- 支持自动告警功能;
- 支持用户权限管理。
3.InfluxDB介绍
- InfluxDB 简介
- InfluxDB 是一个当下比较流行的时序数据库;
- InfluxDB 使用 Go 语言编写;
- InfluxDB 无需外部依赖;
- InfluxDB 适合构建大型分布式系统的监控系统。
- 主要特色功能:
- 基于时间序列:支持与时间有关的相关函数(如最大,最小,求和等);
- 可度量性:可以实时对大量数据进行计算;
- 基于事件:它支持任意的事件数据;
4.安装&配置Grafana、InfluxDB
Grafana 和 InfluxDB 安装非常方便,这一点可以和 Graphite 做一个鲜明的对比。
4.1.安装 InfluxDB
- 安装 InfluxDB
brew update
brew install influxdb
4.2.安装 & 配置 Grafana
- 安装 Grafana
brew update
brew install grafana
- 配置 Grafana
- 使用 vi 命令修改 Grafana 配置文件
vi /usr/local/etc/grafana/grafana.ini
修改 内容如下:
[server]
# Protocol (http, https, socket)
;protocol = http

# The ip address to bind to, empty will bind to all interfaces
;http_addr =

# 此处修改端口号
# The http port  to use
;http_port = 3000         # 【 注意 】这里我用默认 3000 端口,可以根据需要修改。

# 此处修改界面访问地址
# The public facing domain name used to access grafana from a browser
;domain = localhost       # 【 注意 】这里我用默认 localhost 地址,可以根据需要修改。

# Redirect to correct domain if host header does not match domain
# Prevents DNS rebinding attacks
;enforce_domain = false

# The full public facing url you use in browser, used for redirects and emails
# If you use reverse proxy and sub path specify full url (with sub path)
;root_url = http://localhost:3000
5.编写爬虫代码
这里我使用的是以前写的一个爬取豆瓣电影的的爬虫代码。
注意: – 爬虫使用的 MongoDB 的 database 名称为 learn_selenium_doubandianying; – 爬虫使用的 MongoDB 的 table 名称为 movie_info;
爬虫代码,此处省略。
6.编写监控脚本
考虑到可能要增加爬虫到监控中,因此这里使用了热更新对监控进行动态配置。
6.1.监控脚本 influx_monitor.py
import ast
import time
import pymongo
import traceback
from configparser import ConfigParser
from influxdb import InfluxDBClient
from datetime import datetime
from os.path import getmtime

# 配置 influxdb
client = InfluxDBClient(host='localhost', port=8086) # influxdb默认端口为8086

# 创建 database
client.create_database('Spider')
# switch 到 database
client.switch_database('Spider')

# 设定配置文件
config_name = 'influx_settings.conf'

WATCHED_FILES = [config_name]
WATCHED_FILES_MTIMES = [(f, getmtime(f)) for f in WATCHED_FILES]

_count_dict = {}
_size_dict = {}

# 获取配置文件中的设置
def parse_config(file_name):

    try:
        # 创建一个配置文件对象
        cf = ConfigParser()

        # 打开配置文件
        cf.read(file_name)

        # 获取配置文件中的统计频率
        interval = cf.getint('time', 'interval')

        # 获取配置文件中要监控的 dbs 和 collection
        dbs_and_collections = ast.literal_eval(cf.get('db', 'db_collection_dict'))

        return interval, dbs_and_collections

    except:
        print(traceback.print_exc())
        return None


# 从 MongoDB 获取数据,并写入 InfluxDB
def insert_data(dbs_and_collections):

    # 连接 MongoDB 数据库
    mongodb_client = pymongo.MongoClient(host='127.0.0.1',port=27017)  # 直接使用默认地址端口连接 MongoDB

    for db_name, collection_name in dbs_and_collections.items():

        # 数据库操作,创建 collection 集合对象
        db = mongodb_client[db_name]
        collection = db[collection_name]

        # 获取 collection 集合大小
        collection_size = round(float(db.command("collstats", collection_name).get('size')) / 1024 / 1024, 2)

        # 获取 collection 集合内数据条数
        current_count = collection.count()

        # 初始化数据条数,当程序刚执行时,条数初始量就设置为第一次执行时获取的数据
        init_count = _count_dict.get(collection_name, current_count)
        # 初始化数据大小,当程序刚执行时,大小初始量就设置为第一次执行时获取的数据大小
        init_size = _size_dict.get(collection_name, collection_size)

        # 得到数据条数增长量
        increase_amount = current_count - init_count
        # 得到数据大小增长量
        increase_collection_size = collection_size - init_size

        # 得到当前时间
        current_time = datetime.utcnow().strftime('%Y-%m-%dT%H:%M:%SZ')

        # 赋值
        _count_dict[collection_name] = current_count
        _size_dict[collection_name] = collection_size

        # 构建
        json_body = [
            {
                "measurement": "crawler",
                "time": current_time,
                "tags": {
                    "spider_name": collection_name
                },
                "fields": {
                    "count": current_count,
                    "increase_count": increase_amount,
                    "size": collection_size,
                    "increase_size": increase_collection_size

                }
            }
        ]
        # 将获取
        if client.write_points(json_body):
            print('成功写入influxdb!',json_body)


def main():
    # 获取配置文件中的监控频率和MongoDB数据库设置
    interval, dbs_and_collexctions = parse_config(config_name)

    # 如果配置有问题则报错
    if (interval or dbs_and_collexctions) is None:
        raise ValueError('配置有问题,请打开配置文件重新设置!')

    print('设置监控频率:', interval)
    print('设置要监控的MongoDB数据库和集合:', dbs_and_collexctions)

    last_interval = interval
    last_dbs_and_collexctions = dbs_and_collexctions

    # 这里实现配置文件热更新
    for f, mtime in WATCHED_FILES_MTIMES:
        while True:
            # 检查配置更新情况,如果文件有被修改,则重新获取配置内容
            if getmtime(f) != mtime:
                # 获取配置信息
                interval, dbs_and_collections = parse_config(config_name)
                print('提示:配置文件于 %s 更新!' % (time.strftime("%Y-%m-%d %H:%M:%S")))

                # 如果配置有问题,则使用上一次的配置
                if (interval or dbs_and_collexctions) is None:
                    interval = last_interval
                    dbs_and_collexctions = last_dbs_and_collexctions

                else:
                    print('使用新配置!')
                    print('新配置内容:', interval, dbs_and_collexctions)
                    mtime = getmtime(f)

            # 写入 influxdb 数据库
            insert_data(dbs_and_collexctions)

            # 使用 sleep 设置每次写入的时间间隔
            time.sleep(interval)

if __name__ == '__main__':
    main()
6.2.配置文件 influx_settings.conf
配置文件主要用于热更新相关设置 。
# [需要监控的 MongoDB 数据的 数据库名 和 集合名]
[db]
db_collection_dict = {
    'learn_selenium_doubandianying': 'movie_info',
    }

# [设置循环间隔时间]
[time]
interval = 8
7.配置 Grafana
7.1. 运行 influxDB
python3 influx_monitor.py
新建一个 terminal 窗口,使用 vi 命令修改配置文件 influx_settings.conf 。
vi influx_settings.conf
修改间隔时间为8秒,并保存退出。 这时运行 influxDB 的窗口,提示配置更新,说明配置热更新可用。
7.2. 启动 grafana
brew services start grafana
7.3. 运行爬虫文件
启动 MongoDB 数据库服务。
brew services mongodb start
7.4. Grafana web窗口设置
- 打开 Chrome 浏览器,输入 http://127.0.0.1:3000 登录 grafana 页面。
- 连接本地 influxDB 数据库。
- 设置监控的数据对象
– 在监控脚本中,写入influxDB的代码如下,其中 “measurement” 对应 表名,”fields” 对应写入的字段;
“measurement”: “crawler”, “fields”: { “count”: current_count, “increase_count”: increase_amount, “size”: collection_size, “increase_size”: increase_collection_size }